Decoding 38 kHz IR signals with an Arduino Nano
So... I have ambitions to use an ESP8266 board to control an IR LED and switch things on and off according to Alex voice control. I have discussed how to implement Alexa voice control on an ESP-01S board here. In this blog post I'll discuss how to grab, analyse and process an IR signal, ready to be re-transmitted. In this case, I am using an TSOP4838 IR receiver, which takes an IR signal modulated at 38 kHz and demodulates to the corresponding 1s and 0s. What is signal demodulation? This explains signal modulation excellently (stolen from SB-projects):

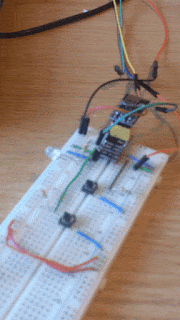
Note the signal inversion here as well (i.e. no transmitted signal corresponds to a HIGH received signal). Here I'm using an Arduino Nano and a TSOP4838 IR recevier hooked up to D12 on the Arduino Nano and powered according to the datasheet. Of course there are libraries already available to do this - but I was really interested in examining the raw signal and learning what was going on myself. And hopefully you are too! Let's jump right in and grab that IR signal!
It helps if we zoom in a bit to the first 30,000 microseconds (30 ms), see below:
It is worth remembering that the IR receiver pin is HIGH when inactive and goes LOW when the first sequence is received, and then toggles back and forth until complete - this will be the inverse transmitted IR LED pattern, so I've inverted the values here to reflect the transmitted demodulated pattern, rather than the received demodulated pattern. The raw data is shown above. Due to inaccuracies in our time measurements, we measure 9080 microseconds for the first signal and 4400 microseconds for the second signal. From a bit of intuition (and looking online!) we can assume there is an initial HIGH signal of 9 milliseconds followed by a LOW signal of 4.5 milliseconds. There is a clear structure apparent on the zoomed-in figure above. From the raw data, we can see three groups of numbers such as 624, 628, etc and 504, 500, 496, etc and a third group of 1636, 1632, etc. We know that this is the demodulated signal, which originally oscillates at 38 kHz, corresponding to a period of 26.3... microseconds. Could our three sets of data really be 632, 500 and 1632? This would be neat and expected, and would correspond to 24, 19 and 62 periods at 38 kHz for the three timing groups. The "quantise_IRsignal" function takes the raw timings, divides by the TIME_BASE (26.3... microseconds) to calculate the cleaned up multiples of a 38 kHz signal.
Looking closer at the data, we can see following that the 9 ms/4.5 ms leader sequence is followed by pairs of HIGH and LOW, with variable timings. These are very regular and encode the 1s and 0s of the sequence (the reds and greens in the figure)! We can see that every 0 or 1 bit is started by a 632 us HIGH pulse (24 oscillations @ 38 KHz), and the proceeding length of the LOW signal determines whether the bit is 0 or 1. In my decoding interpretation, a short LOW time (500 microseconds, 19 periods @ 38 KHz) is a '0' and a longer LOW time (1632, 62 periods @ 38 KHz) is a '1'. The reds in the figure indicates a '0' sequence, and the greens indicate a '1' sequence. In order to transmit this sequence at a later stage, it is convenient to compress the 1s and 0s encoded into a single number. So what we want to do now is take the cleaned up/quantised signal, encode into 1s and 0s, and string together to give a large number - I call this "compressing" the IR signal.
Stay tuned as we send out the signal on an Arduino Nano, and using an ESP8266 board!

Note the signal inversion here as well (i.e. no transmitted signal corresponds to a HIGH received signal). Here I'm using an Arduino Nano and a TSOP4838 IR recevier hooked up to D12 on the Arduino Nano and powered according to the datasheet. Of course there are libraries already available to do this - but I was really interested in examining the raw signal and learning what was going on myself. And hopefully you are too! Let's jump right in and grab that IR signal!
Grabbing an IR signal
It was surprisingly straight-forward to decode an IR signal from a remote. A 38 kHz IR receiver is powered by 5V and the signal pin is hooked up to D12. In setup():#define IR_PIN 12 // D12 . . . // In setup(): pinMode(IR_PIN, INPUT_PULLUP);The IR receiver demodulates the 38 kHz signal and we then simply watch the IR receiver pin go HIGH and LOW and we time the intervals inbetween.
#define MAX_TIMES 128
#define TIME_OUT 2000000 // if whole thing takes longer than 200ms
#define READ_IRPIN (PINB & (1<<4))
.
.
.
void loop() {
 uint8_t curr_state;
 uint8_t state = 0; // 0 = Waiting for signal, 1=actively receiving, 2 = processing and display results
 uint8_t time_index = 0;
 long timing[MAX_TIMES], start_time=0, curr_time=0;

 Serial.println("Entering main loop, waiting for IR");
 while(1)
 {
  if (state==0) // WAITING FOR SIGNAL
  {
    if (!READ_IRPIN)
    {
      start_time = micros();
      time_index = 0;
      state = 1; // switch to active recieving and recording
      curr_state = 0;
    }
  } // state 0
  else if (state==1)
  {
    curr_time = micros();
    uint8_t pin_state = READ_IRPIN;
    if (curr_state!=pin_state) // there was a change of state
    {
      timing[time_index] = curr_time;
      time_index++;
      curr_state = pin_state;

      if (time_index>=MAX_TIMES)
      {
        Serial.println("ERROR: MAX TIMINGS EXCEEDED");
        state=0;
      }
    } // end change of ir pin
    else if (curr_time-start_time>TIME_OUT)
    {
       Serial.println("Time out");
       state = 2;
    }
  } // state1
  else if (state==2)
  {
     if (time_index+1<20) {Serial.println(time_index+1);break;} // Noise
     #ifdef DEBUG
     Serial.print("Number of transitions:");
     Serial.println(time_index+1);
     #endif
     quantise_IRsignal(&timing[0], start_time, time_index);
     compress_IRsignal(&timing[0], time_index);

     state = 0;
  }// state 2
 } // end while
The code is fairly straightforward. A simple state machine is implemented, the program can either be waiting for the start of an IR signal (state=0), currently recording an IR signal pattern (state=1) or finished reading an IR signal (state=2). The IR pin is held high by the IR receiver and goes low when a signal is first detected. Note there is an inversion here, a LOW signal on the IR pin corresponds to a '1' in the transmitted signal, and vice versa. When in recording state (state=1), the code simply detects transitions in the IR pin and records the time in microseconds. DO NOT USE THE ARDUINO digitalRead() function - it is very slowly and rather inefficient - this gives you very inaccurate timings! Instead read the IR pin directly on the PINB register - I use a macro for this, see "READ_IRPIN" in the code for reading pin PB4 (D12). A time out is used to trigger the end of reading the signal and the recorded timings can be readout. Take care to shield the IR receiver as it can get confused if in direct sunlight. At the end of reading we have an array of timings, that correspond to the toggling transitions between HIGH and LOW when the IR signal was detected. We could leave things at this stage if we wanted. To replicate the signal we simply have to reproduce these timings to an IR LED! There is one thing to keep in mind though - the output signal must be modulated at 38 kHz, so we must remember to do that.
Decoding the IR signal
In the mean time, let's look at the signal collected and see if we can uncover the structure of it and clean it up a bit. |
| Full IR sequence for switching on a device |
 |
| First 30 milliseconds of full received IR sequence above |
#define TIME_BASE (1000000/38000.0f) // In microseconds
.
.
.

void quantise_IRsignal(long *array, long start, uint8_t len)
{
     long delta_t;
     // Clean up raw data into multiples of unit base time
     for (uint8_t i=0; i<len; i++)
     {
      delta_t = array[i]-start; // Turn absolute times into differences
      start = array[i];
      array[i] = delta_t;
      uint16_t clean;
      clean = round(array[i]/TIME_BASE);

      #ifdef DEBUG
      Serial.print("Raw:");
      Serial.println((long)array[i]);
      #endif

      array[i] = clean;
     }
}
Looking closer at the data, we can see following that the 9 ms/4.5 ms leader sequence is followed by pairs of HIGH and LOW, with variable timings. These are very regular and encode the 1s and 0s of the sequence (the reds and greens in the figure)! We can see that every 0 or 1 bit is started by a 632 us HIGH pulse (24 oscillations @ 38 KHz), and the proceeding length of the LOW signal determines whether the bit is 0 or 1. In my decoding interpretation, a short LOW time (500 microseconds, 19 periods @ 38 KHz) is a '0' and a longer LOW time (1632, 62 periods @ 38 KHz) is a '1'. The reds in the figure indicates a '0' sequence, and the greens indicate a '1' sequence. In order to transmit this sequence at a later stage, it is convenient to compress the 1s and 0s encoded into a single number. So what we want to do now is take the cleaned up/quantised signal, encode into 1s and 0s, and string together to give a large number - I call this "compressing" the IR signal.
Compressing the IR signal
The function "compress_IRsignal" takes the cleaned up array of timings (from "quantise_IRsignal"), interprets as 1s and 0s based on this array and compares to the determined timings. Note there is a bit of manual work involved. The code is pretty minimal for the task, you should examine the sequence manually in order to determine what is going on in terms of timings. In my case, I have identified 24, 19 and 62 multiples of the period of 38 kHz as my signal units, so these are used by compress_IRsignal.
#define LOW_TIME 24
#define HIGH_TIME_0 19
#define HIGH_TIME_1 62
.
.
.
void compress_IRsignal(long *array, uint8_t len)
{
     uint16_t low,high;
     uint8_t IRcode[8]={0,0,0,0,0,0,0,0},byte_index=0,bit_index=0;// 64 bits of data (not including leading sequence)

     for (uint8_t i=0; i <len-2; i+=2)
     { // Display in pairs

      low = array[i]; high = array[i+1];

      if (low==LOW_TIME && high==HIGH_TIME_0)
      {
        Serial.print("0");
        clr_bit(IRcode[byte_index],bit_index);
        bit_index++; if (bit_index>=8) {byte_index++;bit_index=0;}
        // low time
      }
      else if (low==LOW_TIME && high==HIGH_TIME_1)
      {
        Serial.print("1");
        set_bit(IRcode[byte_index],bit_index);
        bit_index++; if (bit_index>=8) {byte_index++;bit_index=0;}
      }
      else if (i==0)
      {
        Serial.print("Leading sequence:");
        Serial.print(low);Serial.print(", ");Serial.println(high);
      }
      else
      {
        Serial.println("Error: Could not compress low/high combination - is time_base correct and are LOW_TIME and HIGH_TIME_0 and HIGH_TIME_1 correctly defined?");
      }
     }

     Serial.print("0x");
     for (uint8_t b=0; b<=byte_index;b++)
     {
      if (b<byte_index || (b==byte_index && bit_index>1)) Serial.print(IRcode[b],HEX);
      }
     Serial.print("\nOK\n");
     Serial.print(IRcode[b],BIN);
}
Now we have fully evaluated this signal - it has a leader sequence of 9 and 4.5 ms followed by 32 logic bits of "0x32CD817E", according to the characteristic timings of 24, 19 and 62. With the signal now in a very compact and portable format, we can think about how to re-transmit it and emulate the IR remote control!
Stay tuned as we send out the signal on an Arduino Nano, and using an ESP8266 board!


Hello, but what clr_bit() and set_bit() do?
ReplyDeleteHi Forest,
Deleteclr_bit and set_bit are functions (actually macros) that clear a specified bit and set a specified bit and are defined as so:
#define clr_bit(reg,bit) reg &= ~(1<<bit)
#define set_bit(reg,bit) reg |= (1<<bit)
Thanks for your comment, well spotted.
This comment has been removed by a blog administrator.
ReplyDelete