Using the NodeMCU ESP-12E board with Arduino, MicroPython and Lua!
Many ventures into the world of the ESP8266 chip and making Internet of Things devices would do worse than to start with the NodeMCU ESP-12E board. I started my journey with the powerful but stripped back ESP-01S board - useful for projects such my IR-Egg and cat litter tray Twitter bot where space is an a premium, and very few GPIOs are required. However I have recently got my hands on some NodeMCU ESP-12E boards and I'm enjoying the relative abundance of broken out pins, the builtin USB with 5V --> 3.3V conversion and programming over the USB. So far I have used the ESP-12E boards in a couple of small projects, namely as a SPIFFs HTTP file server and as the reciprocal HTTP client.
(1) Simply plug in the board into a USB port on your computer
(2) Windows should automatically detect and install the CP210x driver, which will allow the board to communicate with the NodeMCU ESP-12E board.

Note: If Windows does not automatically install the driver, you will need to install it manually from here: https://www.silabs.com/products/development-tools/software/usb-to-uart-bridge-vcp-drivers
Some people have complained that the board still doesn't appear sometimes. This might be because some USB cables are solely for charging and don't have data lines connected - so make sure you have a USB data cable.
(3) Take note of the COM port that the Windows assigns to the board - in my case it was COM15.
There are three main options to program the board directly - using C/C++ in the Arduino IDE, using MicroPython and using Lua
(5) Launch the Arduino software and go to File-->Preferences and paste: http://arduino.esp8266.com/stable/package_esp8266com_index.json into the "Additional Boards Manager URLs" text box towards the bottom of the dialog box.
(6) Go to Tools-->Boards-->Boards Manager and type "esp8266" in the search box. Select the latest non-beta version (i.e. 2.5.0) and hit the Install button.
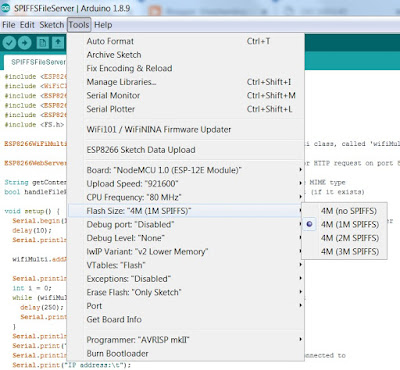
(7) Go to Tools-->Boards-->And select "NodeMCU 1.0 (ESP-12E module)" as the board. The board settings should match those in the image (the SPIFFs Flash Size doesn't really matter at this stage)
(8) You are now ready to run your first program! There are lots to choose from, but flashing an LED is customary. Go to File-->Examples-->01.Basics-->Blink. After uploading you should see the red LED on the board flashing.

Enjoy ESP8266 content? You might also enjoy:
 |
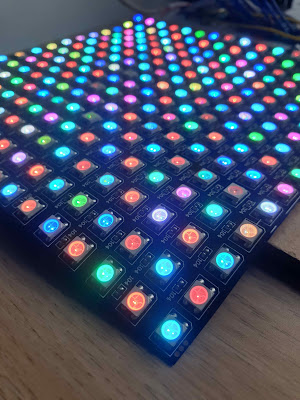
| The board has a whopping 4 Mb of flash memory available, and an embarrassment of pins - I feel spoilt! |
There are three main options to program the board directly - using C/C++ in the Arduino IDE, using MicroPython and using LuaHow to Get Started With The NodeMCU ESP-12E Board
(1) Simply plug in the board into a USB port on your computer
(2) Windows should automatically detect and install the CP210x driver, which will allow the board to communicate with the NodeMCU ESP-12E board.

Note: If Windows does not automatically install the driver, you will need to install it manually from here: https://www.silabs.com/products/development-tools/software/usb-to-uart-bridge-vcp-drivers
Some people have complained that the board still doesn't appear sometimes. This might be because some USB cables are solely for charging and don't have data lines connected - so make sure you have a USB data cable.
(3) Take note of the COM port that the Windows assigns to the board - in my case it was COM15.
There are three main options to program the board directly - using C/C++ in the Arduino IDE, using MicroPython and using Lua
Arduino
(4) The easiest way to program this board is to use the Arduino IDE (although you can program with Lua and Micropython also). If you don't have it installed already, go to https://www.arduino.cc/en/main/software and download the Arduino software (version 1.8.9 at time of writing).(5) Launch the Arduino software and go to File-->Preferences and paste: http://arduino.esp8266.com/stable/package_esp8266com_index.json into the "Additional Boards Manager URLs" text box towards the bottom of the dialog box.
(6) Go to Tools-->Boards-->Boards Manager and type "esp8266" in the search box. Select the latest non-beta version (i.e. 2.5.0) and hit the Install button.
(7) Go to Tools-->Boards-->And select "NodeMCU 1.0 (ESP-12E module)" as the board. The board settings should match those in the image (the SPIFFs Flash Size doesn't really matter at this stage)

(8) You are now ready to run your first program! There are lots to choose from, but flashing an LED is customary. Go to File-->Examples-->01.Basics-->Blink. After uploading you should see the red LED on the board flashing.
MicroPython
(4) First we need a functioning Python environment on our computer and to install esptool. Using the pip package is the easiest way to do this. Firstly, install Python 3.7.0 from here. When asked, you MUST tick box to add path to windows (this is crucial!). Open a command line prompt in Windows and type python, which should launch the python environment (type: quit() to exit).
(5) Now download the get-pip.py file and download it into a convenient working directory.
(6) In the command line, go to the working directory containing get-pip.py and type: python get-pip.py , which will install the pip package.
(7) Now we are ready to install esptool.py, which we need to upload the microPython environment to the board. First though we have to UNINSTALL pyserial and then reinstall the latest version, otherwise esptool will not work properly. So type:
pip uninstall pyserial
pip install pyserial
to upgrade the pyserial version. Now install esptool by typing:
pip install esptool
Check it is all working (with your board plugged in...):
esptool --port COM5 flash_id
where COM5 is your COM port. If all is working, the flash_id of your board should be returned.
(8) Now you are ready to download the latest ESP8266 microPython binary. Get it here. I recommend getting the latest stable .bin file. First erase the flash using:
esptool --port COM5 erase_flash
Then, navigate to the folder in the command line and write the binary using:
esptool --port COM5 --baud 460800 write_flash --flash_size=detect -fm dio 0 esp8266-20190125-v1.10.bin
All being well, the ESP-12E board should now be running microPython!
(9) Open a serial monitor such as Putty and connect to your COM port with baudrate = 115200 and you should be presented with the microPython REPL() interface. This didn't work for me initially (the serial interface didn't allow keyboard inputs), and it turned out the serial connection details were very important. Make sure you have Parity = None, and Flow control = None, see image.

All being well, you should now be able to connect to the microPythonised ESP-12E board and hey presto - you can run microPython on your board!
(10) To access the file system of the board, ampy from Adafruit is a pretty neat tool. To install:
pip install adafruit-ampy
and
ampy --help
To get a list of commands - you'll be able to get a list of files on the system, look at their contents, remove files and replace files.
(11) WebREPL is a handy way of sending python (and files) to the board over a network. It is straight-forward to set up, using the ESP-12E as a WiFi hotspot to connect too following these instructions from Adafruit. It is possible to connect the ESP-12E to your home network and run WebREPL that way - which is highly convenient!
Lua
(4) We need to get a version of Lua. There isn't a "standard" version and there are various services for compiling a binary to upload to the ESP8266. The easiest I came across is here: https://nodemcu-build.com/
Simply enter your email address, choose the master binary with the default options, and click to build. You will be notified by email that your build has begun, and then that it has finished - it shouldn't take more than 5-10 minutes depending on traffic. Download the binary and put it in a convenient folder.
(5) We'll need a tool to upload the binary to the ESP8266, which will be the esptool (see also the MicroPython instructions, reproduced here). First we need a functioning Python environment on our computer and to install esptool. Using the pip package is the easiest way to do this. Firstly, install Python 3.7.0 from here. When asked, you MUST tick box to add path to windows (this is crucial!). Open a command line prompt in Windows and type python, which should launch the python environment (type: quit() to exit).
(6) Now download the get-pip.py file and download it into a convenient working directory.
(7) In the command line, go to the working directory containing get-pip.py and type: python get-pip.py , which will install the pip package.
(7) Now we are ready to install esptool.py, which we need to upload the microPython environment to the board. First though we have to UNINSTALL pyserial and then reinstall the latest version, otherwise esptool will not work properly. So type:
pip uninstall pyserial
pip install pyserial
to upgrade the pyserial version. Now install esptool by typing:
pip install esptool
Check it is all working (with your board plugged in...):
esptool --port COM5 flash_id
where COM5 is your COM port. If all is working, the flash_id of your board should be returned.
(8) To upload our Lua environment, we need the binary file from step (4). First let's erase the flash, just to be sure:
esptool --port COM5 erase_flash
then upload using:
esptool --port COM5 erase_flash write_flash -fm dio 0 nodemcu-master-7-modules-2019-04-17-19-20-27-integer.bin
where "nodemcu-master-7-modules-2019-04-17-19-20-27-integer.bin" is your downloaded binary file (you must run this command in the same folder as the file)
(9) Open a serial monitor such as Putty and connect to your COM port with baudrate = 115200 and you should be presented with the Lua interface. Make sure you have Parity = None, and Flow control = None, see image below.
All being well, you should now be able to connect to the Lua-ised ESP-12E board and hey presto - you can run Lua on your board! (It will complain about not being able to find "init.lua". This is fine as we haven't put any Lua scripts on the board yet, not least "init.lua") We really want to run scripts from files, rather than type everything in line by line, so we need a way of uploading Lua scripts.
(10) I came across Luatool, but I couldn't get it working and seems like it has become depreciated over time... nodemcu-uploader worked really well for me. Installing should just be a matter of:
pip install nodemcu-uploader
In case you have other versions of Python (i.e. 2.7), make sure the C:\Python27\ and C:\Python27\Scripts\ folders are in your PATH. We can upload files and do all sorts with this uploader, not least create scripts and upload them like so:
nodemcu-uploader --port COM5 upload init.lua
There are examples of Lua code elsewhere online, though the language syntax appears to have changed a little over time, so some of it won't run with the latest version of the language. Enjoy!


Comments
Post a Comment