Hey Alexa, switch on Project
Setting up Arduino IDE for ESP8266, ESP-01S and FauxMo.
 |
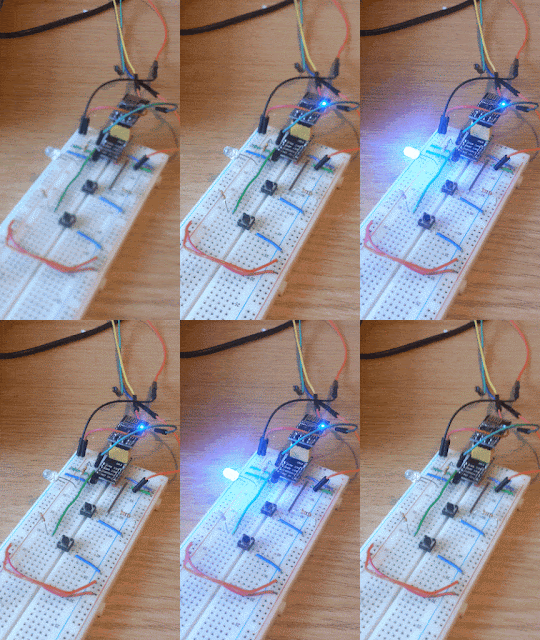
| Hey Alexa, are you listening? |
 |
| The ESP-01S board in all its glory |
Setting up Arduino GUI with the ESP-01S module
This was fairly straightforward, though there was a "gotcha" in reference to the FauxmoESP library and the latest version of the software, which meant some care is needed.1) Wire up ESP-01S board
Essentially I followed the instructions here:
https://www.hackster.io/ROBINTHOMAS/programming-esp8266-esp-01-with-arduino-011389
I hooked up RX->TX and TX->RX to an USB->UART converter and used the converter's 3.3V to power the ESP-01S board. GPIO0 is the programming pin and was pulled high and also wired to a small button to pull it to ground prior to reset to enter programming mode. CH_PD is pulled high to 3.3V, GND to GND, obvs.
2) Setup Arduino environment and install ESP8266 board definitions (version 2.3.0)
I'm using Arduino version 1.6.5. In order to use the ESP8266 we'll need to install some board definitions. This is really straightforward, with one potential pitfall. If we want to use the "FauxMo" library for adding Alexa voice control to projects for 2nd generation devices, we MUST install the version 2.3.0 of the ESP8266 board definitions AND the FauxMo library! Otherwise it doesn't work (though it will still work for 1st generation Alexa devices, I believe).
The SparkFun instructions are characteristically excellent:
https://learn.sparkfun.com/tutorials/esp8266-thing-hookup-guide/installing-the-esp8266-arduino-addon
After adding the URL in File > Preferences, go to Tools > Boards > Boards Manager, search for "ESP", select "More info" link and select version 2.3.0 in the drop-down menu that appears. Now we just need to install the Fauxmo library (note if you aren't interested in Alexa voice control for ESP8266 projects, you can obviously just install the latest ESP8266 board definitions and skip this step and run a blinky LED from the Examples)
The board settings I used for the ESP-01S are:
So a generic ESP8266 board, with most of the default settings. I have 1M of flash on this board, and the SPIFFS is simply a soft allocation within that memory for files/documents (https://tttapa.github.io/ESP8266/Chap11%20-%20SPIFFS.html). Given I'm running very small programs at the moment, and not using SPIFFS, I don't worry too much about this setting for now. I'm using the CPU frequency at 80 MHz for now, for reasons of power consumption, but it might be interesting to play around with setting it to 160 MHz and understanding any possible tradeoffs that might entail (i.e. some early reports of increased code instability at 160 MHz).
3) FauxmoESP installation version 2.3.0
To reiterate, there is an issue using the latest version of FauxmoESP with some Alexa devices (https://bitbucket.org/xoseperez/fauxmoesp), so make sure to download the 2.3.0 version which is compatible with the new Alexa devices. The default version, didn't work for me. I had to make sure I completely uninstalled and reinstalled the 2.3.0 FauxMo in order for it to work from here:
https://bitbucket.org/xoseperez/fauxmoesp/downloads/?tab=tags
4) Run and launch an example sketch:
#include <Arduino.h>
#ifdef ESP32
#include <WiFi.h>
#else
#include <ESP8266WiFi.h>
#endif
#include "fauxmoESP.h"
#include "credentials.h"
#define SERIAL_BAUDRATE 115200
#define LED 2
fauxmoESP fauxmo;
// -----------------------------------------------------------------------------
// Wifi
// -----------------------------------------------------------------------------
void wifiSetup() {
// Set WIFI module to STA mode
WiFi.mode(WIFI_STA);
// Connect
Serial.printf("[WIFI] Connecting to %s ", WIFI_SSID);
WiFi.begin(WIFI_SSID, WIFI_PASS);
// Wait
while (WiFi.status() != WL_CONNECTED) {
Serial.print(".");
delay(100);
}
Serial.println();
// Connected!
Serial.printf("[WIFI] STATION Mode, SSID: %s, IP address: %s\n", WiFi.SSID().c_str(), WiFi.localIP().toString().c_str());
}
void setup() {
// Init serial port and clean garbage
Serial.begin(SERIAL_BAUDRATE);
Serial.println();
Serial.println();
// Wifi
wifiSetup();
// LED
pinMode(LED, OUTPUT);
digitalWrite(LED, HIGH);
// You can enable or disable the library at any moment
// Disabling it will prevent the devices from being discovered and switched
fauxmo.enable(true);
// Add virtual devices
fauxmo.addDevice("switch one");
//fauxmo.addDevice("switch two"); // You can add more devices
//fauxmo.addDevice("switch three");
// fauxmoESP 2.0.0 has changed the callback signature to add the device_id,
// this way it's easier to match devices to action without having to compare strings.
fauxmo.onSetState([](unsigned char device_id, const char * device_name, bool state) {
Serial.printf("[MAIN] Device #%d (%s) state: %s\n", device_id, device_name, state ? "ON" : "OFF");
digitalWrite(LED, !state);
});
// Callback to retrieve current state (for GetBinaryState queries)
fauxmo.onGetState([](unsigned char device_id, const char * device_name) {
return !digitalRead(LED);
});
}
void loop() {
// Since fauxmoESP 2.0 the library uses the "compatibility" mode by
// default, this means that it uses WiFiUdp class instead of AsyncUDP.
// The later requires the Arduino Core for ESP8266 staging version
// whilst the former works fine with current stable 2.3.0 version.
// But, since it's not "async" anymore we have to manually poll for UDP
// packets
fauxmo.handle();
static unsigned long last = millis();
if (millis() - last > 5000) {
last = millis();
Serial.printf("[MAIN] Free heap: %d bytes\n", ESP.getFreeHeap());
}
}
You'll need to supply your credentials in a local "credentials.h" file in the Arduino sketch folder (see the github example this is taken from for details), i.e.
#define WIFI_SSID "..."
#define WIFI_PASS "..."
You can program the ESP-01S by pressing the GPIO0 button to send it low, then toggling reset, with GPIO0 still held low, then releasing the GPIO0 button - essentially GPIO0 must be low when the ESP8266 IC boots up. It is now in a state to accept code - simply compile and upload the code. You might need to hit the RESET button again to boot up (don't touch GPIO0 this time) to get the code running and uploading.
Now ask Alexa to "discover new devices" when your ESP8266 is switched on - it should find the registered ESP8266 device(s). Now you can control them with "Hey Alexa, turn on 'switch one'". Have fun!
In my next post I'll detail my attempts at using an ESP-01S to control an infrared LED and turn things on and off with it, via Alexa voice control!


Comments
Post a Comment